Arduino core for ESP32 WiFi chip
Need help or have a question? Join the chat at 
Development Status
Most of the framework is implemented. Most noticable is the missing analogWrite. While analogWrite is on it's way, there are a few other options that you can use:
- 16 channels LEDC which is PWM
- 8 channels SigmaDelta which uses SigmaDelta modulation
- 2 channels DAC which gives real analog output
Installation Instructions
Using through Arduino IDE
Instructions for Mac
-
Install latest Arduino IDE from arduino.cc
-
Open Terminal and execute the following command (copy->paste and hit enter):
curl -o get-pip.py https://bootstrap.pypa.io/get-pip.py && \ sudo python get-pip.py && \ sudo pip install pyserial && \ mkdir -p ~/Documents/Arduino/hardware/espressif && \ cd ~/Documents/Arduino/hardware/espressif && \ git clone https://github.com/espressif/arduino-esp32.git esp32 && \ cd esp32/tools/ && \ python get.py -
Restart Arduino IDE
Instructions for Debian/Ubuntu Linux
-
Install latest Arduino IDE from arduino.cc
-
Open Terminal and execute the following command (copy->paste and hit enter):
sudo usermod -a -G dialout $USER && \ sudo apt-get install git && \ wget https://bootstrap.pypa.io/get-pip.py && \ sudo python get-pip.py && \ sudo pip install pyserial && \ mkdir -p ~/Arduino/hardware/espressif && \ cd ~/Arduino/hardware/espressif && \ git clone https://github.com/espressif/arduino-esp32.git esp32 && \ cd esp32/tools/ && \ python get.py -
Restart Arduino IDE
Decoding exceptions
You can use EspExceptionDecoder to get meaningful call trace.
Using PlatformIO
PlatformIO is an open source ecosystem for IoT development with cross platform build system, library manager and full support for Espressif ESP32 development. It works on the popular host OS: Mac OS X, Windows, Linux 32/64, Linux ARM (like Raspberry Pi, BeagleBone, CubieBoard).
- What is PlatformIO?
- PlatformIO IDE
- Quick Start with PlatformIO IDE or PlatformIO Core
- Integration with Cloud and Standalone IDEs - Cloud9, Codeanywehre, Eclipse Che (Codenvy), Atom, CLion, Eclipse, Emacs, NetBeans, Qt Creator, Sublime Text, VIM and Visual Studio
- Project Examples
Using as ESP-IDF component
-
Download and install esp-idf
-
Create blank idf project (from one of the examples)
-
in the project folder, create a folder called components and clone this repository inside
mkdir -p components && \ cd components && \ git clone https://github.com/espressif/arduino-esp32.git arduino && \ cd .. && \ make menuconfig -
make menuconfighas some Arduino options- "Autostart Arduino setup and loop on boot"
-
If you enable this options, your main.cpp should be formated like any other sketch
//file: main.cpp #include "Arduino.h" void setup(){ Serial.begin(115200); } void loop(){ Serial.println("loop"); delay(1000); } -
Else you need to implement
app_main()and callinitArduino();in it.Keep in mind that setup() and loop() will not be called in this case
//file: main.cpp
#include "Arduino.h"

extern "C" void app_main()
{
    initArduino();
    pinMode(4, OUTPUT);
    digitalWrite(4, HIGH);
    //do your own thing
}
-
- "Disable mutex locks for HAL"
- If enabled, there will be no protection on the drivers from concurently accessing them from another thread/interrupt/core
- "Autoconnect WiFi on boot"
- If enabled, WiFi will start with the last known configuration
- Else it will wait for WiFi.begin
- "Autostart Arduino setup and loop on boot"
-
make flash monitorwill build, upload and open serial monitor to your board
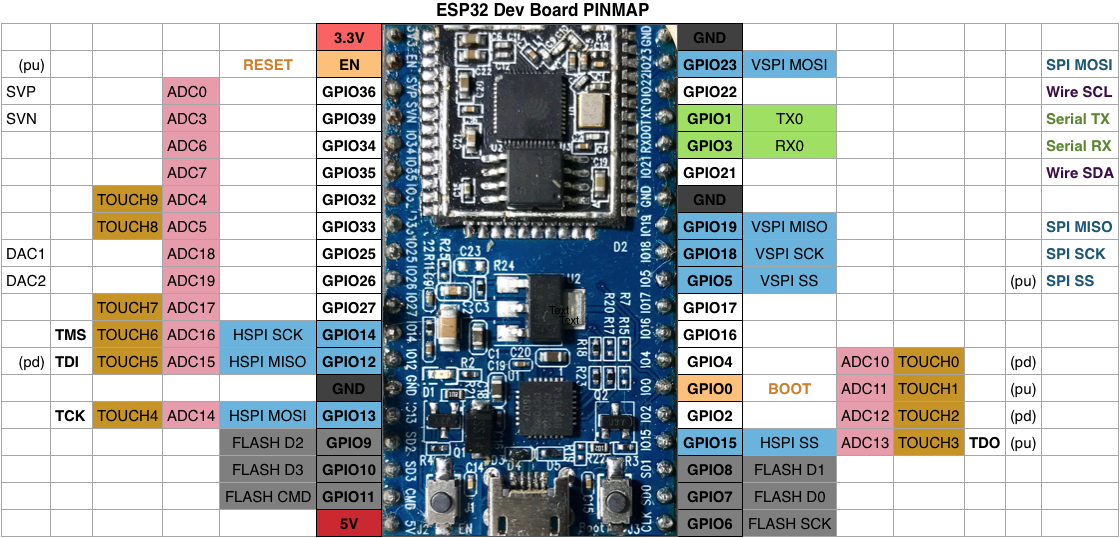
ESP32Dev Board PINMAP